
NOTE: If your frames and any FasBild™ options have not yet been assembled, we think that your base is probably the best place to assemble them. If they have, it is time to proceed to the next step.
The First Step in Jig Assembly:
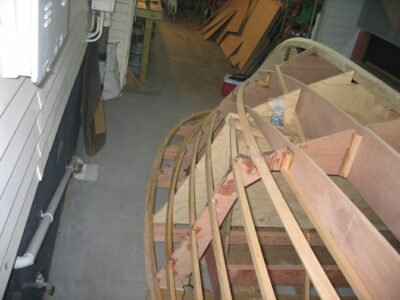
All ENVIBOATS hull jigs include a component we call the ‘plate’. It has the shape of the boat in top view.
The plate is attached to the base with screws and has slots or ‘mortises’ in which all the stations and FasBild™ bulkheads (if you purchased them) will be inserted. The center section of the plate should be installed first. The process is as follows:
- Measure each end of the base for the longitudinal centerline.
- Offset the centerline half the width of the center section of the plate. They are usually 8″ wide except on very small boats where it is 6″. Therefore the line should be offset either 3″ or 4″.
- Snap a line using a chalk line tool or put a screw on each end and tie a string between them.
- Lay the center sections of the plate along the line you just made and screw them down.
- Now fit the remaining pieces of the plate but don’t screw them down until you have verified that they are truly symmetrical.
The first step in assembling the jig is to first assemble just about everything we shipped to you.
This includes, of course, the jig itself but it also may include FasBild™ Components. Let’s discuss them first:
Assembling the FasBild™ Components:
First, a general overview about our FasBild components. As many of you know, ENVIBOATS offers quite a few options that can greatly speed up the process of building one of our boats. We call these our FasBild components. If we can do some or all of the fabrication for you via our CNC equipment, then we can offer these components as FasBild. For many of our boats, they include:
- Keel
- Stringers
- Transom
- Bulkheads
- Floors (the supports under the sole)
- Deck Structure Components
- Fuel Tank Beds
- Sheerbands
We have NO desire to require you to purchase these options so we engineered our jigs to allow you to construct them yourself if you so desire. Many of our current builders feel that the additional expense is well worth it when they examine the trade-off between making these componenents vs. buying them.
The advantages are clear enough. If you put them into the jig, they are already there when you flip her. Imagine not having to hand fit a single bulkhead.
We estimate that the entire FastBuild package on one of our boats will save the builder about 140 man-days of construction.
Ok, now you know a bit about the ENVIBOATS FasBuild components.
So the question at hand is: “How do we assemble them and incorporate them into our build?”
We believe that the very best place to assemble your FastBuild components happens to be your newly constructed and perfectly level base. Start by organizing all the parts. Each part from ENVIBOATS is engraved with an ID number. Typically Jig Stations are numbered starting at the transom and bulkheads / floors are lettered also starting aft.
Key point: We try to make the assembly process as easy as possible by providing CNC cut alignment holes into which you insert lengths cut from standard dowels. (Typically 1/2″ dowels) The purpose of the dowels is not to “lock” the pieces together during the gluing process but more of an alignment and assembly guide. If the holes don’t line up, somebody did something wrong and we should stop, talk, and sort it out.
Once you sort and identify the parts that form a FasBuild™ component, arrange them on the base like you will be gluing them together. This is called “dry-fitting”.
Key point: Protect the base with a sheet of plastic. The last thing you want to do is to glue the FasBuild™ components down to the base.
To clamp the parts while gluing, you will drive screws completely through them directly into the deck of your base. Use drywall screws and fender washers in the same way you will clamp your planks when you get to that point in your build. Some of the FasBuild™ components will require significantly longer screws, however. Once you have dry-fit the parts and understand their orientation, drive a few screws in them before you mix the glue. The “problem” you are trying to avoid is that when the parts have epoxy on them, they tend to slide around as you are clamping. The dowels definitely help you avoid this situation but the few screws that you just drove when you dry-fitted the parts will ensure that this does not happen.
Let’s do some gluing:
- Unscrew the parts and organize them on the base in the order that you intend to apply glue.
- Apply epoxy glue to the surfaces to be joined using your notched spreader. The glue should be thickened to roughly the consistency of peanut butter.
- Stack the parts.
- Insert the dowels.
- Drive the screws back into the exact same holes that were prepared during the dry-fit process.
- Drive enough new screws to properly clamp the component.
- Clean as much glue “squeeze-out” as feasible prior to the epoxy hardening.
Key point: Extra care should be taken to ensure that the stringers are assembled as rights and lefts. The parts comprising the stringers are identical in their right / left versions. What makes them “handed” is the order and orientation by which they are assembled.
Key point: Let’s discuss FasBuild transoms. On boats where the transom is bigger than a sheet of plywood, the transom is usually assembled from four layers. The forward two layers are assembled into the forward “half” and likewise for the aft “half”. Assemble the halves individually but do NOT put all both halves together at this time.
Additional instructions will describe that process.
Now on to the next part where the fun begins